Sage Construction Management
Getting Started
The Sage Construction Management API provides access to a variety of features, including Companies, Contacts, Projects, Project Financials, Labor Timecards, Equipment Timecards, and Misc. Expenses. Most features, including Labor Timecards, Equipment Timecards, and Misc. Expenses, provide both read and create access, whereas Job Cost Code and Project Financials provide read access only.
The API is built using REST principles, which ensures the use of predictable URLs that simplifies the development of applications. Each resource is exposed as a URL, and you can retrieve the URL of all available resources by accessing the API root endpoint. The API also adheres to HTTP standards, enabling a wide range of HTTP clients to interact with the API.
To use the API, you must do the following:
Set Up a Developer Account on Sage Construction Management
You can set up a developer account in Sage Construction Management either for external or internal use. Accounts for internal use do not require approval from Sage Construction Management. However, accounts intended for use by external applications must undergo an approval process. Once approved, the creation of a Sandbox database is initiated. By default, the Sandbox database is valid for 1 month. Extensions to the Sandbox database may be granted by Sage Construction Management.
Depending on whether the account is internal or external, the user is notified when the account and database are ready to create applications and Integration and Secret Keys.
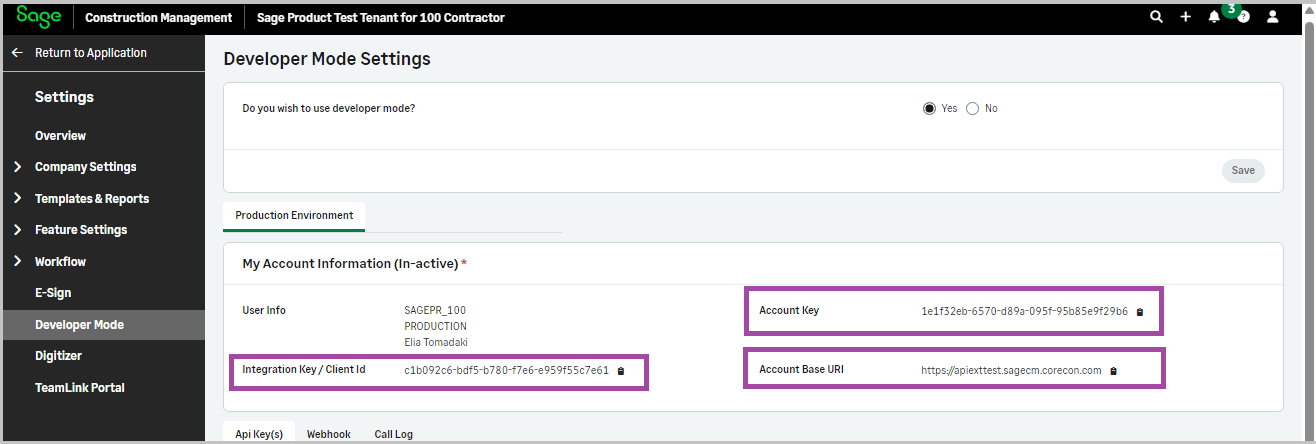
Step 1: Enable Developer Mode
Procedure:
- 1. Log in to Sage Construction Management.
- 2. Select Settings > Developer Mode.
- 3. Select Yes to enable the Developer Mode.
- 4. Select Save.
Sage Construction Management generates the Integration Key (Client Id), the Account Key, and the API Account Base URL.
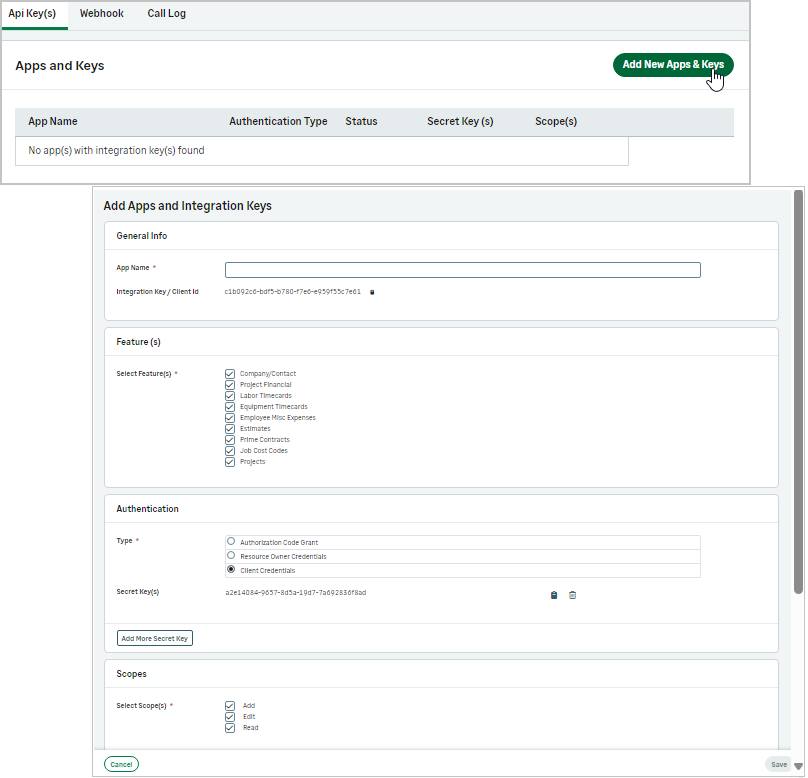
Step 2: Add Apps and Integration Keys
You can specify the following parameters when creating application and integration keys:
- - Application Name
- - Allowed feature(s)
- - Authentication type
- - Secret Key(s)
- - Scope(s)
- - Redirect URI(s)
- - State
- - Refresh Token LifeTime (in mins)
- - Allowed Origins
Procedure:
- 1. In the API Key(s) tab, select Add New Apps & Keys.
- 2. Enter the App Name.
- 3. Select the required features.
- 4. Select the Type of Authentication.
- 5. Select the required Scopes.
- 6. Configure any additional settings as needed.
- 7. Select Save.
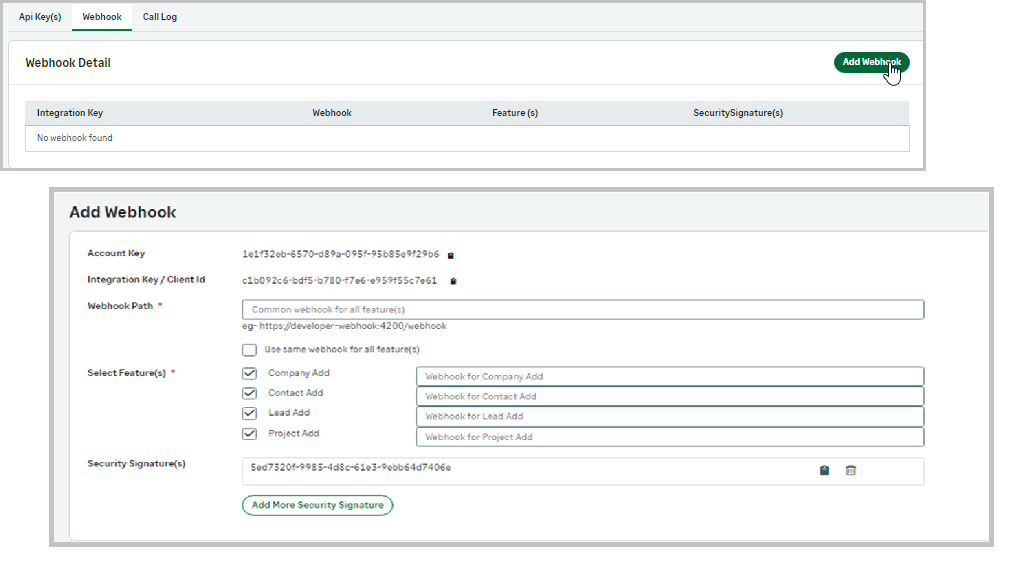
Step 3: Add Webhooks (optional)
Webhooks are used when a user wants Sage Construction Management to call a URL after a specific function is performed within the application. For example, when a user adds a company, Sage Construction Management can call an external system to add the company in that system too.
Procedure:
- 1. Select the Webhook tab.
- 2. Enter a Webhook Path.
-
3. Do one of the following:
- - To use the same webhook for all features, select the respective option and select the desired features.
- - To use a different path for each feature, select the desired features and enter the appropriate webhook next to each feature.
-
4. Enter a security signature to verify the webhook call.
The signature will be in the header whenever the webhook is called and should be used to authenticate the call from Sage Construction Management.
Enable Access on Production for External Applications
Procedure:
- 1. Download one of the sample application templates provided in the and create your application.
- 2. Make some API calls to thoroughly test your application and ensure that is properly handled.
-
3. Send your application for review to the Sage Construction Management administrator.
The Sage Construction Management administrator will review and test your application.
- 4. Once your application is approved, you can use it to connect to the production accounts.
Example: Access the Sage Construction Management API Using OAuth 2.0 Authentication
The Sage Construction Management API uses the Authorization code, Resource Owner Password Credentials, or Client Credentials authentication method to authorize and authenticate calls.
Step 1: Register a New Client
First you need to register your application with Sage Construction Management's Developer console to get your Client ID and Account Key.
Procedure:
- 1. Log in to Sage Construction Management, go to the Developer mode settings, and get the Client ID.
-
2. Enter the required information to register your application.
Upon successful registration, you will receive a set of OAuth 2.0 credentials, including a Client ID and Client Secret, which are recognized by both Sage Construction Management and your application. Keep these credentials confidential and do not share them with anyone.
Step 2: Generate the Access and Refresh Tokens
Use one of the authentication methods described in the section to get the access and refresh tokens.
The access token expires after 60 minutes.
The refresh token can be used to generate a new access token after the current one expires.
Step 3: Generate an Access Token from the Refresh Token
Access tokens have limited validity. Before they expire, they have unlimited usage. Once an access token expires, your application must use the refresh token to request a new access token.
Step 4: Calling the Sage Construction Management API
Access tokens can be passed only in the header and not in the request parameters.
The header name should be Authorization.
The Header value should be the Sage Construction Management Access Token with the following format: {bearer access_token}